October is here, and McSweeny Farms is ready to embrace the spooky season! Check out some of our exciting upcoming events, fun Halloween crafts and a delicious new recipe.

Soltera by Richmond American Homes at McSweeny Farms: Azure
A charming, covered entry welcomes guests to the ranch-style Azure plan. Inside, you’ll find an open great room, an impressive kitchen featuring a center island and a walk-in pantry, and an adjacent dining nook. An inviting primary suite with an attached bath and immense walk-in closet. Additional highlights include a second bathroom, a central laundry, a mudroom, a covered patio and a 2-car garage. Additional features may include a great room fireplace, a third bedroom in lieu of the study and a 3-car garage.
1,590 Square Feet | 2-3 Beds | 2 Baths | 2-3 Car Garage | Single Story Ranch
Theme Park Bucket List
Have you checked out the McSweeny Farms Instagram page yet? If not, you can find it right HERE! It has the latest info on upcoming events, fun things to do in Hemet, and exciting updates about our community.
California offers some of the most iconic theme parks in the world, which means tons of fun Halloween festivities for the whole family. Let us know how many you have visited!
My Theme Park Bucket list:
Legoland – Brick or Treat
Disneyland – Oogie Boogie Bash
Knott’s Scary Farm
Six Flags Magic Mountain – Fright Fest
Universal Studios Hollywood – Halloween Horror Nights
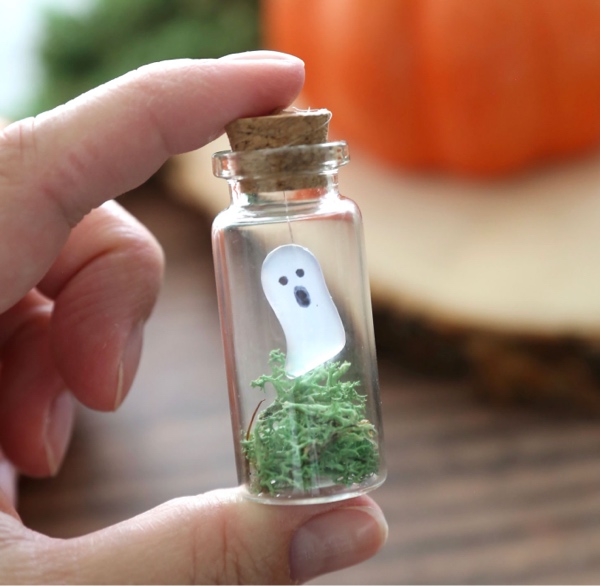
Halloween Craft – Pet Ghosts
Get the kids involved in this fun Halloween Craft! These tiny ghosts in a bottle make the perfect mess free “pet” to keep everyone happy this Halloween season.
Materials:
- Mini Glass Bottles/Jars with cork stoppers: Here is a link to some small 10-ml glass bottles from Amazon. You can use any small bottles or vials you can find. These ones were inexpensive and quite small (2 inches in height). Look for bottles or jars with cork stoppers if possible.
- Glue gun and Glue sticks: The “ghost” part of this craft is made of hot glue which is squeezed out and allowed to dry. You can use a full size or a mini size glue gun to make the ghosts, although a full-size glue gun is a little quicker and easier. This important thing here is to use glue sticks that are white, not completely clear, or else your ghosts will be very hard to see inside the bottles. The Gorilla brand glue sticks have a nice white color.
- Fine Tip Sharpie: for adding eyes and a mouth to your ghost
- Moss: to line the bottom of the jars to give them a “graveyard” feel. One option is reindeer moss from Dollar Tree.
- Fishing line: this is used to suspend the ghost in the bottle, so it looks like it’s floating. 6ml fishing line seems to look the best. You could use thread if you prefer.
- Needle (optional): A needle is the easiest way to send the fishing line through the cork stopper in the jar so the ghost will float right in the middle of the bottle. Any sharp craft or sewing needle with a small eye should work. However, you can skip this step and just sandwich the fishing line in between the jar and the stopper if you prefer, but the ghost may not float in the very middle of the bottle that way.
- You will also need a piece of aluminum foil on which to create the ghosts.
Instructions:
- Make The Hot Glue Ghosts
Grab a square of aluminum foil and fold it in half and then in half again. This is what you’ll squeeze the hot glue out on to make the ghosts.
Cut a six-inch length of fishing line and lay it down on your foil square.
Create a ghost by squeezing a large dot of hot glue out onto one end of the fishing line. Continue squeezing out glue to create a ghost shape. If you are using the 2-inch bottles recommended, your ghost should be about 3/4 of an inch tall. (Don’t stress if you don’t like the shape of your first ghost – you can make another! In fact, you may want to practice a few times first before gluing with a piece of fishing line.) - Draw The Face
Allow the hot glue to cool for about two minutes. You’ll see it begin to get cloudy as it cools.
As soon as it feels cool to the touch and firm, pick up the foil and peel it off the back of the glue ghost, which will have a piece of fishing line coming out of the top.
Don’t wait or the glue will bond to the foil, and you won’t be able to pull it off. You’ll see that once the ghost is pulled off the foil it looks much whiter.
Use a fine tip or ultra fine tip Sharpie to draw eyes and a mouth on the ghost. - Assemble The Pet Ghost
Open one of your mini jars and place a little bit of moss in the bottom of it. You can use the end of your sharpie to smash the moss down at the bottom of the jar.
If you are using a needle, thread the other end of the fishing line on it. Then starting from the bottom, push the needle through the cork stopper. Using a thimble or something like a ruler to push down on the needle will be helpful.
Once the needle is all the way through, you’ll see your ghost suspended from the cork.
Place a tiny bit of hot glue on top of the cork where the fishing line comes out to secure it, then snip off the excess fishing line. Your pet ghost is complete!
If you don’t want to use a needle to thread the line through the cork, just lower the ghost into the mini bottle until it’s where you want it, then place the cork stopper on, sandwiching the fishing line between the lid and the edge of the bottle. This is easier, but the ghost may not “float” as nicely because it won’t be in the very center of the bottle.
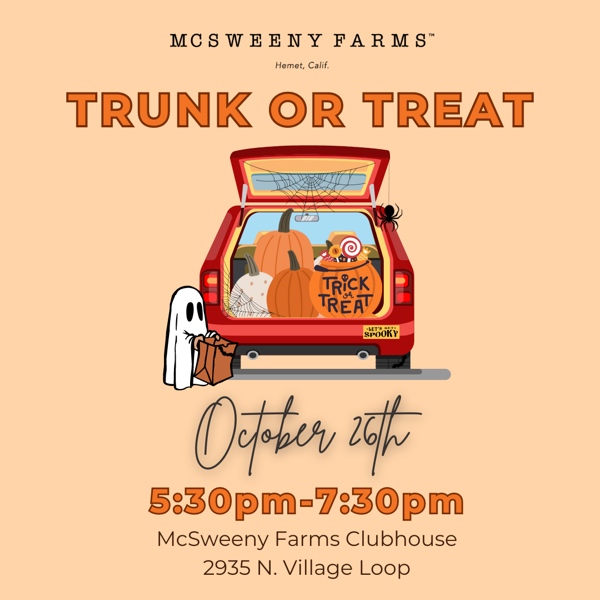
Annual Trunk or Treat
Don’t forget, our Annual Trunk or Treat event is Saturday, October 26th! Bring the whole family to enjoy an evening of fun activities and treats. This is a great chance to show off your costumes before Halloween night and spend some time with family and neighbors. Check out some of these photos from past Trunk or Treat events!

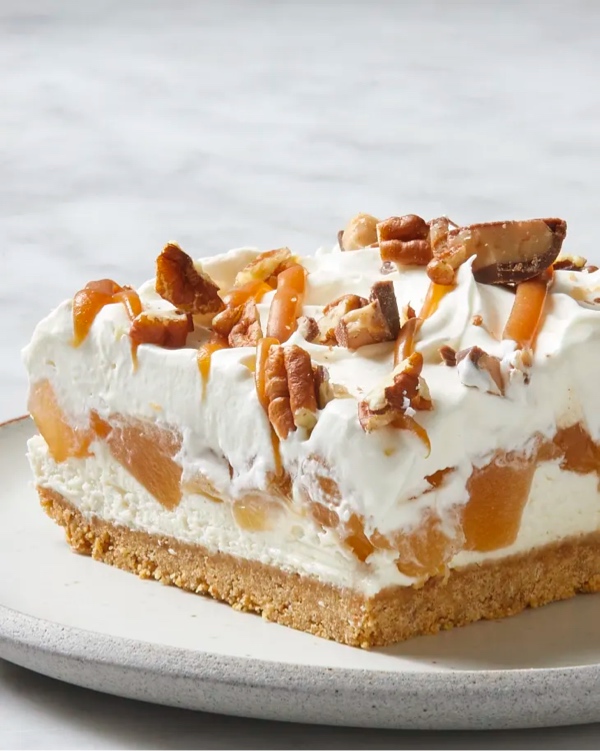
Celebrate Fall with No-Bake Caramel Apple Delight
This No-Bake Caramel Apple Delight is the perfect sweet treat to compliment any fall party. Give it a try with the recipe below!
Ingredients:
- 8 ounces cream cheese
- 8 tablespoons (1 stick) unsalted butter
- 12 whole graham crackers sheets (about 6 1/2 ounces), or 1 1/2 cups graham cracker crumbs
- 2 tablespoons granulated sugar
- 1/2 teaspoon kosher salt, divided
- 1/2 cup powdered sugar, divided
- 1 teaspoon vanilla extract
- 1 1/2 cups cold heavy cream
- 1 (about 21-ounce) can apple pie filling
- 1/4 cup pecans (optional)
- 1 (1.4-ounce) chocolate-covered English toffee bar, such as Heath (optional)
- 2 tablespoons caramel sauce
Instructions:
- Place 8 ounces cream cheese in the bowl of a stand mixer (or large bowl if using an electric hand mixer). Let sit at room temperature until softened, about 45 minutes. Line an 8×8-inch baking pan with 2 sheets of parchment paper, positioning them perpendicular to each other, so that the parchment hangs about 2 inches over all 4 sides of the pan to form a sling.
- Melt 1 stick unsalted butter in a small microwave-safe bowl in 20-second bursts until mostly melted, 40 to 60 seconds total (it will melt completely as it sits). (Alternatively, melt the butter in a small saucepan over medium heat.) Set aside to cool slightly.
- Break 12 whole graham cracker sheets into rough pieces and place in a food processor fitted with a blade attachment. Add 2 tablespoons granulated sugar and 1/4 teaspoon of the kosher salt. Process until the crackers are the texture of sand, about 15 seconds. Add the butter and pulse to combine, 6 to 8 (1-second) pulses. (If using graham cracker crumbs, just stir 1 1/2 cups crumbs and the butter together in a medium bowl.)
- Transfer the mixture to the baking pan. Use the bottom of a measuring cup or your fingers to press the crumbs into an even layer, making sure to reach the edges and fill the corners. Refrigerate while you prepare the filling.
- Add 1/4 cup of the powdered sugar, 1 teaspoon vanilla extract, and the remaining 1/4 teaspoon kosher salt to the cream cheese. Beat with the paddle attachment on medium speed until light and very fluffy, about 3 minutes.
- Place 1 1/2 cups cold heavy cream and the remaining 1/4 cup powdered sugar in a second large bowl. (If using a stand mixer, transfer the cream cheese mixture to a large bowl. Wash and dry the bowl and use it to whip the cream.) Beat with the whisk attachment on high speed until stiff peaks form, 2 to 4 minutes.
- Transfer 1 cup of whipped cream to the cream cheese mixture and gently fold together with a flexible spatula until just combined. Cover the remaining whipped cream and refrigerate until ready to use.
- Dollop the cream cheese mixture into the baking dish and spread into an even layer. Open 1 can apple pie filling and use kitchen shears to coarsely chop the apple slices. Spoon the filling over the cream cheese mixture and spread into an even layer.
- Spoon the remaining whipped cream over the apple layer and spread into an even layer. Cover and refrigerate for at least 1 hour or up to overnight.
- When ready to serve, coarsely chop 1/4 cup pecans and/or 1 chocolate-covered English toffee bar, if using. Grasping the excess parchment, transfer the apple delight slab to a cutting board. Cut into 9 squares, wiping the knife between each cut for cleaner cuts. Drizzle with 2 tablespoons caramel sauce and sprinkle with the pecans and/or toffee.
Check out the full recipe by The Kitchn.
